

The Tesla Model 3 is known for its sleek design, impressive performance, and cutting-edge technology.
However, like any other vehicle, it can encounter issues over time. One common problem that Tesla Model 3 owners have reported is a creaking noise when turning.
This noise can be quite annoying and concerning, but the good news is that it can often be resolved with some simple troubleshooting and maintenance.
In this article, we will explore the various reasons why your Tesla Model 3 might make a creaking noise when turning and provide step-by-step solutions to each of these issues.
Why Does Tesla Model 3 Make Creaking Noise When Turning?
Your Tesla Model 3 may make a creaking noise due to various factors, such as faulty front upper arms, worn-out ball joints, dry or damaged rubber bushings, loose suspension components, or door-related issues. These problems can lead to friction, misalignment, or wear in the vehicle’s suspension and door systems, resulting in audible creaking sounds during turns.
Faulty Front Upper Arms
The front upper arms, also known as upper control arms or upper A-arms, are essential components of your Tesla Model 3’s suspension system. They play a crucial role in controlling the movement of the front wheels, allowing for smooth and precise steering.
Over time, several issues can arise with these components, leading to creaking noises when turning.
Wear and Tear: One common problem is wear and tear due to the constant stress and load placed on the front suspension. The ball joints and bushings in the front upper arms can degrade, leading to increased friction and unwanted noise.
Impact Damage: Impact from potholes, road debris, or accidents can also damage the front upper arms. Even a minor collision can cause misalignment or bending of these components, resulting in noise during turns.
Corrosion: Exposure to harsh weather conditions and road salt can lead to corrosion of the front upper arms, compromising their structural integrity and causing creaking noises.
How to know if that’s the cause:
Determining whether faulty front upper arms are causing the creaking noise in your Tesla Model 3 involves a few key observations:
- Audible Creaking: If you hear a distinct creaking or squeaking noise when turning, especially at low speeds or when parking, it could be an indication that the front upper arms are problematic.
- Uneven Tire Wear: Inspect your tire treads for signs of uneven wear. If the front upper arms are worn or damaged, they can cause alignment issues, resulting in uneven tire wear.
- Visible Damage: Conduct a visual inspection of the front upper arms. Look for visible signs of damage such as cracks, bends, or rust. Any of these issues may suggest a problem with the arms.
Steps to fix it:
If you are certain that the front upper arms are causing the creaking noise while driving your Tesla Model 3, here are the steps to address this issue:
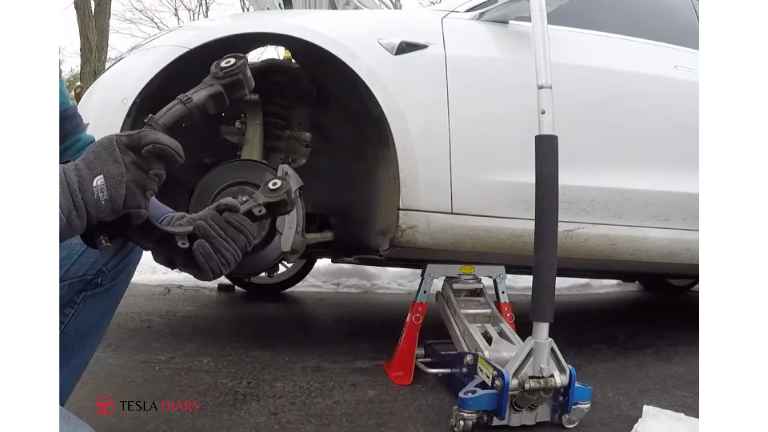
Jack up the Vehicle: Begin by safely jacking up the front of the vehicle and supporting it securely with jack stands. Ensure that you follow proper safety procedures.
Inspect the Front Upper Arms: Carefully inspect the front upper arms for any visible damage or wear. Pay close attention to the ball joints and bushings.
Replace Damaged Parts: If you find any signs of damage or excessive wear, it’s essential to replace the affected parts. This typically involves replacing the entire front upper arm assembly.
Consult a Professional: Replacing front upper arms can be a complex task that requires proper tools and expertise. It’s highly recommended to consult a qualified Tesla technician or an experienced mechanic for this repair.
However, if you want to do it yourself, here is a detailed video-
Alignment Check: After replacing the front upper arms, it’s crucial to have a professional perform a wheel alignment to ensure that the suspension components are properly adjusted. Proper alignment will not only eliminate creaking noises but also improve vehicle handling and tire longevity.
Remember that attempting to replace front upper arms without the necessary knowledge and equipment can be risky and may lead to safety hazards or improper vehicle alignment. It’s always best to rely on professionals for this type of repair to ensure the safety and performance of your Tesla Model 3.
Ball Joints Worn Out
Ball joints are critical components of the suspension system in your Tesla Model 3. They connect the steering knuckle to the control arms and allow for the smooth articulation of the front wheels during turns. Over time, ball joints can wear out or become damaged due to various factors:
- Normal Wear and Tear: As your Tesla Model 3 accumulates mileage, the ball joints are subject to regular use and stress. Over time, the constant movement and friction can cause them to wear out.
- Lack of Lubrication: Ball joints require proper lubrication to function smoothly. If they do not receive adequate lubrication, friction increases, leading to wear and ultimately, creaking noises.
- Environmental Factors: Harsh weather conditions, road salt, and exposure to moisture can accelerate corrosion and rust on the ball joints, affecting their performance.
- Impact Damage: Hitting potholes, curbs, or other road hazards can cause abrupt forces on the ball joints, potentially leading to damage or accelerated wear.
How to know if that’s the cause:
To determine if worn-out ball joints are the source of the creaking noise when turning in your Tesla Model 3, consider the following indicators:
- Audible Creaking: If you hear creaking or squeaking sounds when turning, especially during low-speed maneuvers, it is a strong indication that the ball joints may be worn or damaged.
- Vibrations in the Steering Wheel: Worn ball joints can cause vibrations in the steering wheel, particularly when turning. These vibrations can be felt through the steering column.
- Uneven Tire Wear: Check your tire treads for signs of uneven wear. Worn-out ball joints can lead to misalignment issues, resulting in uneven tire wear.
Steps to fix it:
If you suspect that worn-out ball joints are causing the creaking noise in your Tesla Model 3, follow these steps to address the issue:
Safety First: Ensure the safety of your vehicle by parking it on a level surface, engaging the parking brake, and chocking the rear wheels. Also, wear appropriate safety gear when working on your vehicle.
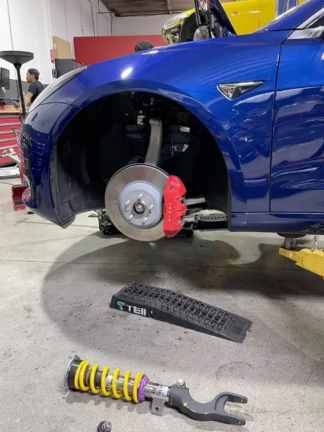
Lift the Front of the Vehicle: Use a suitable jack to lift the front of the Tesla Model 3 off the ground. Support the vehicle securely with jack stands to prevent it from falling.
Inspect the Ball Joints: Examine the ball joints for visible signs of wear, damage, or excessive play. Pay attention to any rust or corrosion on the joints. To inspect, you will need to follow the video provided above.
Please note that, in many cases, you will find the ball joints to be rusty. If that’s the case, the only thing you need to do is use rust-removing solutions such as- vinegar, baking soda, or a store-bought rust remover on ball joints so that the rust goes away.
Replace the Ball Joints: If you find that the ball joints are worn or damaged, they should be replaced promptly. Replacing ball joints is a complex task that typically requires specialized tools and expertise. So, I recommend taking support from Tesla.
No Lubricant in Rubber Bushings
Rubber bushings are integral components of your Tesla Model 3’s suspension system. They are designed to reduce friction, absorb shocks, and allow for smooth movement of various suspension parts.
Over time, rubber bushings can deteriorate or lose their lubrication, leading to creaking noises when turning. Here’s what could have gone wrong:
Dry Bushings: With age and exposure to environmental factors, the rubber bushings can dry out, lose their elasticity, and become rigid. This causes increased friction between suspension components, resulting in unwanted noise.
Lack of Lubrication: Proper lubrication is essential for rubber bushings to function smoothly. If the lubrication dries up or is insufficient, the rubber bushings may not effectively reduce friction, leading to creaking sounds.
How to know if that’s the cause:
To determine if the absence of lubrication in the rubber bushings is causing the creaking noise in your Tesla Model 3, consider the following signs:
Creaking or Squeaking Noise: If you hear creaking or squeaking noises while turning the steering wheel, especially at low speeds or during parking maneuvers, it is likely due to dry or poorly lubricated rubber bushings.
Stiff Suspension: A lack of lubrication in the bushings can cause the suspension to feel stiffer and less responsive than usual, potentially impacting ride comfort.
Visual Inspection: Inspect the rubber bushings for visible signs of dryness, cracking, or deterioration. If they appear worn or damaged, lubrication may be insufficient.
Steps to solve it:
If you suspect that the absence of lubrication in the rubber bushings is causing the creaking noise in your Tesla Model 3, follow these steps to address the issue:
Safety Precautions: Ensure the safety of your vehicle by parking it on a level surface, engaging the parking brake, and chocking the rear wheels.
Locate the Rubber Bushings: Identify the rubber bushings in the suspension system that may be causing the noise. They are typically found at various points in the suspension, such as control arms and sway bars.
Lubricate the Bushings: Apply a suitable lubricant to the rubber bushings. Use a lubricant recommended by Tesla. Silicone-based or synthetic rubber lubricants are often suitable choices.
Work the Suspension: After applying the lubricant, gently bounce or rock the vehicle to allow the lubricant to penetrate the bushings thoroughly. This helps ensure that the lubricant reaches all critical areas.
Test Drive: Take your Tesla Model 3 for a short test drive to assess whether the creaking noise has been eliminated. Listen for any remaining noises during turns.
Repeat if Necessary: If the creaking noise persists, repeat the lubrication process or consider consulting a qualified technician or mechanic for further inspection and advice.
Properly lubricating the rubber bushings can often resolve creaking noises when turning. However, if you encounter difficulties or if the issue persists, it is advisable to seek professional assistance.
Loose Suspension
A loose suspension can be a significant factor contributing to creaking noises when driving your Tesla Model 3. The suspension system is responsible for maintaining stability, handling, and ride comfort.
Several issues can cause the suspension to become loose or improperly aligned:
Worn or Loose Bolts and Nuts: Over time, the bolts and nuts that secure various suspension components may become loose due to vibration and regular wear and tear. This can result in a loose suspension.
Misaligned Suspension Components: Improperly aligned suspension components, such as control arms, sway bars, or struts, can lead to instability and creaking noises during turns.
Damaged or Worn Bushings: Bushings in the suspension system are designed to absorb shocks and maintain proper alignment. If these bushings are damaged or worn out, the suspension may become loose.
How to know if that’s the cause:
To determine if a loose suspension is the cause of the creaking noise when turning in your Tesla Model 3, look for the following signs:
- Clunking or Knocking Sounds: Loose suspension components can produce clunking or knocking noises, especially when driving over bumps or during turns.
- Vibrations or Instability: A loose suspension can result in vibrations in the steering wheel and an overall feeling of instability while driving, particularly when turning.
- Uneven Tire Wear: Inspect your tire treads for signs of uneven wear. Both loose and stiff suspension components can lead to irregular tire wear patterns.
Steps to solve it:
If you suspect that a loose suspension is causing the creaking noise in your Tesla Model 3, follow these steps to address the issue:
Visual Inspection: Conduct a thorough visual inspection of the suspension components. Look for loose bolts, nuts, and visible signs of wear or damage on bushings.
Tighten Loose Components: If you find any loose bolts or nuts in the suspension system, use the appropriate wrench to tighten them to the manufacturer’s specifications. Pay special attention to critical components like control arms and sway bar links.
Check Alignment: Inspect the alignment of suspension components to ensure they are correctly positioned. If you suspect misalignment, consult a professional mechanic or technician for proper adjustment.
Inspect and Replace Bushings: Examine the bushings for damage or wear. If you find any issues with the bushings, they should be replaced. Bushing replacement may require specialized tools and expertise and is best performed by a qualified technician.
Door Issues
Door-related problems can sometimes be the source of creaking noises when accelerating your Tesla Model 3.
Here’s a more detailed look at what might have gone wrong, how to determine if door issues are causing the noise, and the steps to address them:
What may have gone wrong:
Misaligned Door Seals: The rubber door seals around the edges of the doors help create a tight and quiet cabin. If these seals are misaligned or damaged, they can allow outside noise to penetrate and create creaking or rubbing sounds when turning.
Worn or Damaged Hinges: Door hinges can wear out over time due to frequent use or exposure to the elements. If the hinges are worn or damaged, they may not support the door properly, leading to movement that generates noise during turns.
Door Frame Misalignment: Misalignment of the door frame can cause the door to rub against the frame when turning or going over bumps, resulting in creaking noises.
How to know if that’s the cause:
To determine if door issues are causing the creaking noise when turning in your Tesla Model 3, watch out for the following indicators:
Noise from Specific Doors: Pay attention to whether the creaking noise appears to originate from a specific door or doors when turning or accelerating. If it does, this may suggest a door-related issue.
Visual Inspection: Inspect the rubber door seals for any signs of misalignment, damage, or wear. Look for worn or damaged hinges and check for visible misalignment of the door frame.
Testing Door Movement: Gently open and close each door to check for any unusual resistance, rubbing, or misalignment. Listen for any creaking or squeaking sounds during the process.
Steps to solve it:
If you suspect that door issues are causing the creaking noise, consider the following steps to address the problem:
Inspect and Adjust Door Seals: If you notice misaligned or damaged door seals, attempt to adjust them to ensure they provide a proper seal around the door. Consult your Tesla owner’s manual or service center for guidance on adjusting door seals.
Lubricate Hinges: If you suspect worn or dry door hinges are the issue, apply a suitable lubricant to the hinges. Lubricating the hinges can often eliminate creaking noises associated with door movement.
Check for Frame Misalignment: If the door frame appears misaligned, consult a professional mechanic or a Tesla service center to assess and rectify the misalignment. This may involve adjustments to the door frame or hinges.
Also, sometimes the door card gap becomes more than usual for misalignment issues. You may want to look into that as well. I recommend taking Tesla support from Tesla or a certified mechanic.
Final Words
A creaking noise in your Tesla Model 3 can be attributed to several factors, including faulty suspension components, worn-out ball joints, dry rubber bushings, loose suspension, or door-related issues.
By following the steps outlined for each potential cause, you can diagnose and address the problem, ensuring a quieter and more enjoyable driving experience in your Tesla Model 3.
If you are unsure about any of the steps or encounter difficulties, don’t hesitate to seek professional assistance from a Tesla service center or qualified mechanic.